Showing posts with label Smart Design. Show all posts

Thursday, April 4, 2019

Time for a ball screw printer

While thinking about how to upgrade my Delta printer, I was considering the viability of using ball screws instead of pulleys and belts. However since the movement of the carriages is sometimes 4 times greater that the actual speed of the print head, this seems like a bad idea.

That lead me down onto a path of comparing the existing printer designs.
  • Cartesian: The classic, but moving the bed just creates unnecessary acceleration artifacts.
  • Delta: Looks good, but the aforementioned speed issue, salmon skin/moire and the extra z height cause some issues
  • CoreXY: The underdog, seemingly combines the best from the previous designs, however the long belt path wont be good in combating acceleration artifacts.
  • Cross-Axis/Ultimaker: That could be the one. No moving bed, short belt path and a contained frame, make this a promising option.

With a cross axis design, we would only need one ball screw per axis. With the rigidity we gain from the ball screws we could probably get away with not using a bowden extruder.

That leaves just calculating if we can get cheap enough ball screws and if a normal NEMA17 can drive them fast enough...


This looks pretty much like the design I would go for.

Sunday, May 17, 2015

Pump clipper for Balloonistas

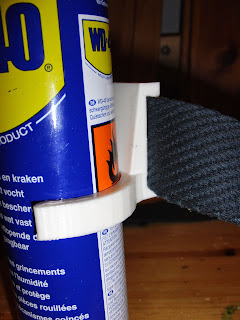
I love my balloon folding but having the pump either under my arm or somewhere on a table where I can't reach it, annoys me. So I 3D printed me a little clip that can hold the pump while I'm busy with the balloons.

I tested this last year successfully and now made a version that fits our pumps even better and is practically unbreakable* since its printed with a rubber-like bio-plastic.

My WD40 bottle is just to demonstrate the workings. I can jump around without it falling out.


*If  you manage to tear it apart you get a new one and an extra price :D

Friday, December 12, 2014

Meshmixer support - a very good alternative

I recently tried the Meshmixer support because I'm tired of Slic3r not being able to calculate its support correctly. Apart from looking really cool it actually works really well.
You could even make organic looking sculptures by using this tree and branch technique.
Below you find a tutorial video how you apply and manipulate the support structures a function that comes in very handy if you know your printer better and only need partial support.

The contact point on the model brake of very easy and are surprisingly stable. The only detail to keep and eye on is that the contact point need to be really on the edge of the overhang, otherwise the underside of said overhang will not look good and have a slope of bad layers in them.

The colored trees are the automatically generated support.


Here the model still hot on the bed.


Friday, November 14, 2014

Something useful - the stove knob

In one of the earliest videos I saw about 3D printing and Reprap, they mentioned printing knobs (link below).

A rather unexciting idea until you realize how inconvenient it is to fiddle around with metal pins when carefully trying to find the perfect temperature to not burn your pancakes.

Luckily someone like minded already provided a template (Oven knob fully customizable).
This works great, so great indeed that I can put in a custom marker for the prefect pancake setting.


Friday, October 31, 2014

Mending Filament

While I was thinking about a temp controller circuit I had the idea to build a little mechanism where you can put two filament ends in and melt them together.

It could basically be a little metal tube cut in half and drilled out to either 1.75 or 3mm hold in block of heat resistant stone or plaster with a hotend 40watt cartridge and a thermistor attached.

Once heated up you put the end in so some seconds, open it up and have continuous filament.
The same heater circuit could also used in a acetone chamber where the cartridge get replace by a heated bed.


Parts:

Solid metal tube like the 8mm straight rods in our printers.

Temp controller like this come already with a thermocouple
http://www.ebay.de/itm/AC-220-V-Digital-PID-Temperatur-Kontrolle-Thermoelement-Controller-0-bis-400-/281291174288?pt=DE_Möbel_Wohnen_Sonstige&var=&hash=item417e42b190

A 12V 40watt hot end cartridge
http://www.ebay.de/itm/Cartridge-Heater-12V-40W-1-5m-Heater-Cartridge-Heating-Element-for-3D-Printer-/361098962779?pt=DE_Computer_Sonstige&hash=item54132ce75b

Tuesday, May 13, 2014

Filastruder working!

Seeing how much hassle I still have with my printer I´m positively surprised how well the Filastruder and Filawinder work together.

Everything comes together nicely and the documentation is good, but the "hobbyists charm" is not lost.


This is our configuration. The Filastruder is angled 45° in order for the plastic to exit in a nice curve. In the final configuration the machine will stand completely upright so that the hot and soft plastic can exit smoothly.


This is the laser meter. I find it the most genius solution of all. The laser project a line onto photocells. Depending on how high or low he shadow of the filament is it tells the winder to speed up or slow down, so that constant tension is applied.


The last step is spooling. On the left side of the blue box is a little servo that controls the arm in a way that distributes the filament evenly on the spool.

There are some minor details still to work on like finding a good equilibrium between temperature, speed and filament diameter, but I´m already printing with self produced filament. Ill report on that next time.

Friday, March 7, 2014

Fora TVReal-World Uses for 3D Printing

More like that please!

I still have trouble thinking about real world applications that go further than just printer improvements, so a little clip from someone like ForaTV hopefully starts this discussion further.


Wednesday, February 26, 2014

New ways - the Wolfstock

I´ve decided to abandon the Eventorbot. After I calculated that I needed at least 100€ more to make the machine work properly I checked what different frames would cost.

There aren´t many frame kits but once I looked up the Delta design and also found out how cheap aluminum extrusions are I decided on the Wolfstock http://wolfmanjm.github.io/wolfstock/


There isn´t much published about this machine so I will leave my opinions along the way.

Friday, February 7, 2014

New pins for Emmets heart gears #Smart Design

Emmet is on it again.
I always had some trouble printing the heart gears with PLA. They just would not turn. He changed the gear ratios and the pins got a mokeover as well. I´m exited to try them out.
You´re not a full fletched printer commander anyway until you printed a heart gear!

Sunday, February 2, 2014

Wing nuts, simple, cheap and useful

Here is something I like for multiple reasons. Thingiverse user Mooncactus provides us with a customizable option to make wings for normal hex nuts. In my local DIY store they cost ~4€/6pcs, making them my self is much more fun.

Tuesday, July 16, 2013

What is a useful 3D printed thing?

One of the goals of this blog is getting away from this:

 "Oh let me 3D scan your face and print a 3cm bust - yay 3D printing is so innovative!" 

But is it really useful? and does it justify investing in a printer yourself? Maybe something in the middle between the really gimmicky stuff and a custom solution requiring experts and hundreds of dollars.

Last year when was trying to find a good way to place the furniture in my room I could have used something like this.


The idea:

Thursday, July 4, 2013

Finally something useful

This a first design of a chain-guard. In bike stores they cost around 20€ and we to produce them at home for 2-3€

Update: I finally debugged the model for slicing. A 30 cm long version would be around 110g of ABS plastic which would cost ~2.10€ at 20€/kg.